Showing posts with label Mac. Show all posts

Thursday, July 12, 2012

Validate Mac App Store Receipt 2012

As many Mac developer did to validate Mac app store receipt, I use roddi's code (https://github.com/roddi/ValidateStoreReceipt Thanks!). But recently I found it does not work! The code fails to validate the sample receipt.

Because I just restored my machine from TimeMachine. I thought maybe there was something wrong in my dev environment. I spent a lot of hours to make sure my development provisioning and certificates are correct. But it still fails to validate the sample receipt.

I read Apple's doc carefully (https://developer.apple.com/library/mac/#releasenotes/General/ValidateAppStoreReceipt/_index.html), and find the solution.

roddi's code is still working. You need not change it. (Just need to get the latest version)

Follow these steps (internet required):

1. Log out from Mac App Store app.

2. Remove USE_SAMPLE_RECEIPT flag from your project settings -> Preprocessor Macros.

3. Compile your project

4. Find this app in Finder

5. Double click it in Finder to run. Do not run it in Xcode.

6. The OS will ask you to log in with your Apple ID. Do not log in with your real iTunes account. You need to log in with the test account. Find it or create it in the iTunesconnect website.

7. The OS will say something like "Your app is broken. Download it in App Store". Ignore this message. If you "Show Package Contents" of this app in Finder, you will see there is a file _MASReceipt/receipt. The OS installed a development receipt. We will not need the old sample receipt any more. That's why we remove USE_SAMPLE_RECEIPT debugging flag.

Done. You can debug your app now.
Wednesday, March 14, 2012

Rebuilding Code Sense and Syntax Highlighting on Xcode 4

Sometimes syntax highlighting does not work on Xcode 4. Syntax highlighting is an important feature to developers. But there is no "Rebuild Code Sense" menu on Xcode 4. We can do it with following steps:

1. Xcode menu: Window->Organizer

2. Go to Projects tab

3. Choose your project on the left panel.

4. Click "Delete…" button after the Derived Data on the right panel.

Xcode will start to rebuild code sense of your project.

Thursday, March 08, 2012

Diff and Merge Localizable.strings in git

The default code set of Localizable.strings is UTF-16. Actually I don't care what code set it is. But git/gitX/SourceTree does not recognize UTF-16 (Stupid!). They treat UTF-16 Localizable.strings as a binary file and reject to diff or merge. This is a very big problem if you work in a team.

Google says we can make git support UTF-16. I tried, but failed. I have to convert Localizable.strings into UTF-8. (Actually before converting, I have manually merged by myself.) Surprisingly, git/SourceTree still says it is a binary file and cannot diff. It's OK. Just commit. Git says it just because the history files are still UTF-16. If you make any new changes, git can diff and merge it. Great!

Tuesday, December 27, 2011

Scroll NSScrollView to Top

AppKit is old and is not as convenient as UIKit. But we have to use it on Mac app development.

"Scroll a scrollview to top" sounds easy, but actually it isn't. If you assign a documentView to a NSScrollView, you will see it scrolls to the bottom. (Very stupid!) The doc did not mention how to scroll to top. I found a way to control the vertical scroller. I can set the scroller to top, but the scrollView is still at bottom!

This post (http://stackoverflow.com/questions/4506391/nsscrollview-jumping-to-bottom-on-scroll) inspired me. I got the solution (of cause, I post my answer on stackoverflow too):

// Scroll the vertical scroller to top

if ([_scrollView hasVerticalScroller]) {

_scrollView.verticalScroller.floatValue = 0;

}

// Scroll the contentView to top

[_scrollView.contentView scrollToPoint:NSMakePoint(0, ((NSView*)_scrollView.documentView).frame.size.height - _scrollView.contentSize.height)];

Friday, December 09, 2011

Wrong info from proc_pidinfo

proc_pidinfo is a very useful function to get a Mac OS X process's info such as the size of resident memory, consumed CPU time.

However, sometimes, the returned info is not correct. For example, a little process's resident memory becomes 4GB. Apple does not provide any document about this function, and I did not see useful comments in the header files.

I am lucky enough to see code snippet in the Apple open source file: http://www.opensource.apple.com/source/lsof/lsof-28/lsof/dialects/darwin/libproc/dproc.c. When we call proc_pidinfo, we must check the returned value. If the returned value is not identical to the size of output data, the output data is wrong.

      nb = proc_pidinfo(pid, PROC_PIDTASKALLINFO, 0, &ti, sizeof(ti));
            if (nb <= 0) {
                if (errno == ESRCH)
                    continue;
                if (!Fwarn) {
                    (void) fprintf(stderr, "%s: PID %d information error: %s\n",
                        Pn, pid, strerror(errno));
                }
                continue;
            } else if (nb < sizeof(ti)) {
                (void) fprintf(stderr,
                    "%s: PID %d: proc_pidinfo(PROC_PIDTASKALLINFO);\n",
                    Pn, pid);
                (void) fprintf(stderr,
                    "      too few bytes; expected %ld, got %d\n",
                    sizeof(ti), nb);
                Exit(1);
            }
I checked the processes with correct info. They are all my processes (not system processes). Seems like my app runs in user mode and it does not have privileges to get info of system processes.

Sunday, October 09, 2011

Xcode 4 and Git

I am new to Git. I used Perforce (P4) before, so I thought it is easy to use Git. Actually I was wrong. Git is not complex, but it has different concept.

In P4, we just check out and check in files. In Git, checking in has a new name Commit. When I committed my first change, I was surprised to see it does not appear in the server. Actually, Git did not really submit my code to the server. It was stored locally. I have to run this command in the command line:

git push origin master

So you must Push the local Commits to the server.

The problem is Xcode 4 can Pull, Commit, Compare, but does not provide Push functionality. How stupid the designer is. You can modify but cannot submit! Actually Pull, Commit and Compare are the only functionalities Xcode 4 provides. You cannot even revert!

Xcode 4 is free, but Apple should not make it suck.

Update on Nov 30, 2011:

SourceTree on Mac App Store is an excellent Git client. It is much better than GitX. And it is FREE!

Friday, August 19, 2011

Add Tool Tip to Controls with Xcode4

Like many Apple developers, I was a developer on Windows platform before. It is very easy to add tool tip to a control (e.g. a button) in Visual Studio. But I don't know how to do it in Xcode. When I am working on iPhone apps, it is not a problem because iPhone apps need not tool tip. But it is a problem when I am working on Mac apps.

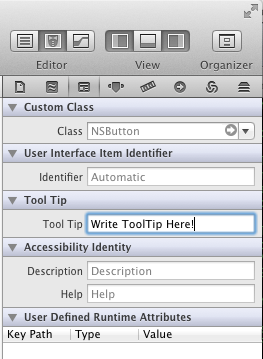
Actually it is easy to add tool tip in Xcode 4. Looks like Apple put it in a wrong place. You need to add tool tip in Identity Inspector.

Add ToolTip in Xcode

Monday, July 18, 2011

Making Your Mac App Support Full Screen in 1 Minute

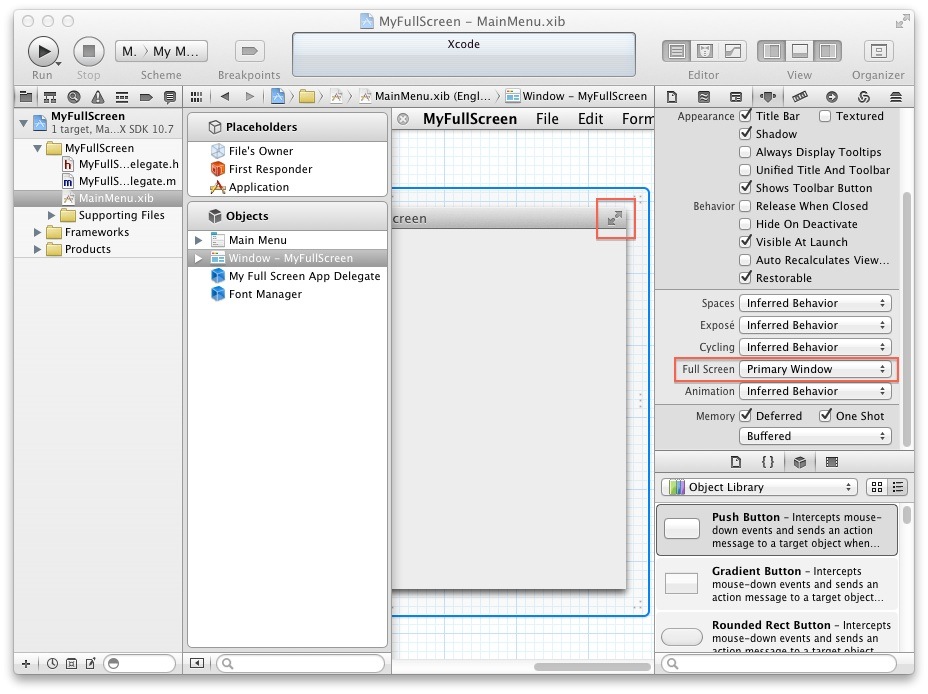
Full screen mode is a cool feature on Mac OS X Lion. I'd like to let my app support full screen. I googled, but did not find any tutorial. I thought there would be an option like'Support full screen' when a new project is created with the new Xcode 4.1 on Lion. Surprisingly, there is no that option. Today I watched a video of WWDC2011 and made this article. I am sure you can follow the steps to make your app support full screen in 1 minute.

I created a new Mac OS X Cocoa Application with Xcode 4.1 on Lion and named it MyFullScreen.

1. Set Base SDK Mac OS X 10.7

2. Choose MainMenu.xib in Project navigator

3. Choose 'Window - MyFullScreen' in Objects

4. Choose 'Primary Window' for Full Screen in Attributes inspector. You will see a new icon on the top-right corner of your main window. Run this app. It already supports full screen!

Make Full Screen

5. You need to add a menu item. Choose 'Menu - View', and then drag 'Full Screen Menu Item' in Object Library into 'Menu - View'.

Full Screen Menu Item

We are done! It is very easy.

Adding a framework in Xcode 4

The steps of adding a framework in Xcode 4:

1. Click current project in Project navigator.

2. Click a target in Project editor.

3. Choose Build Phases tab.

4. Expand Link Binary With Libraries

5. Click + button, add a framework.

6. Go back to Project navigator. You will see the new framework added. You can drag it into Framework group. If you have more than one target, you need not repeat the steps for other target. Just choose this framework in Project navigator, and make selection in Target Membership in File Inspector on the right Utility window of Xcode.

Thursday, April 21, 2011

Programming with Core Animation on Mac

Learning notes of Core Animation for Mac OS X and the iPhone

1. The Simplest animation (CABasicAnimation)

Without animation: [theView setFrame:newFrame];

With animation: [[theView animator] setFrame:newFrame];

[theView animator] is the Animator Proxy which is simply finding an animation and then invoking it. The default animation is CABasicAnimation.

2. CAKeyframeAnimation

With CAfeyFrameAnimation, you can define a series of key frames. CoreAnimation system will create animation based on these key frames. For example, we want to create an animation of moving an image to point A, and then B. We only need to create the key frames of A and B. CAKeyframeAnimation could be understood as a series of CABasicAnimation.

// Create the path

NSRect frame = [theView frame];

CGMutablePathRef thePath = CGPathCreateMutable();

CGPathMoveToPoint(thePath, NULL, NSMinX(frame), NSMinY(frame)); //the origin

CGPathAddLineToPoint(thePath, NULL, pointA.x, pointA.y); //Point A

CGPathAddLineToPoint(thePath, NULL, pointB.x, pointB.y); //Point B

// Create an animation

CAKeyframeAnimation *originAnimation = [CAKeyframeAnimation animation];

originAnimation.path = thePath;

originAnimation.duration = 2.0f;

originAnimation.calculationMode = kCAAnimationPaced;

// Add this animation

[theView setAnimations:[NSDictionary dictionaryWithObjectsAndKeys: originAnimation, @”frameOrigin”, nil]];

// Activate this animation

[[theView animator] setFrameOrigin:pointB]; //set the point of the last frame

Saturday, March 12, 2011

Time Machine error (caused by Mac OS X Lion)

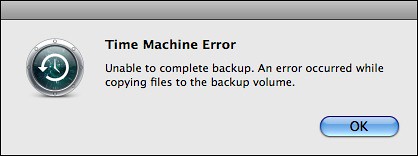
My Time Machine did not work today. I saw the following message:

Time Machine Error

I tried rebooting my mac and reformatting my external disk. They did not help. My external disk looks very healthy. There must be something wrong in Time Machine software.

In order to see what happened, I ran this command in the terminal window:

sudo grep backupd /var/log/system.log

I got many errors like this:

Mar 12 09:21:50 localhost com.apple.backupd[432]: Error: (-36) SrcErr:YES Copying /.DocumentRevisions-V100/PerUID/501/1/com.apple.documentVersions/074F6D28-7E46-4BBD-A877-7896143B9D1A.rtf to (null)

/.DocumentRevisions-V100 was created by AutoSave feature of Mac OS X Lion. I recalled I installed Lion on another partition and saved a file on Snow Leopard partition (to test AutoSave). Lion created that hidden folder on Snow Leopard partition and put the auto saved files there. However, the Time Machine software on Snow Leopard is not updated. It cannot recognize that system folder.
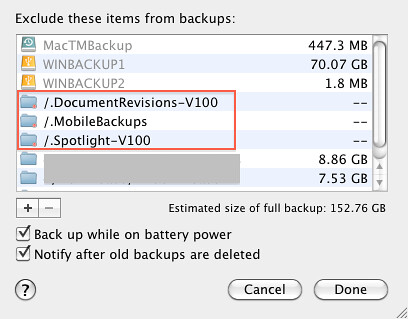
It is easy to fix this Time Machine error. Just exclude that hidden folder in Time Machine Preferences. (You need to enable 'Show invisible items'.) I actually excluded the following 3 hidden folders:/.DocumentRevisions-V100/.MobileBackups/.Spotlight-V100
Exclude folders in Time Machine My Time Machine is working again!This command "sudo grep backupd /var/log/system.log" is very helpful.
Thursday, March 03, 2011

Exploring Mac OS X Lion (3): Versions and Auto Save

1. Versions

Versions is really a revolutionary feature of Mac OS X Lion, though it is not as obvious as Mission Control and Launchpad.

The system records every change to a file automatically. You can browse versions and revert your changes if necessary.

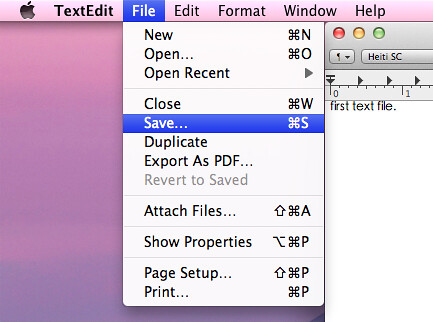
If you create a new file in TextEdit and go to File menu, you can see Save menu item.

Lion Versions Save menu

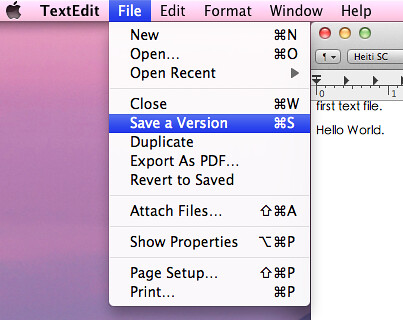
But after you saved your file and make some changes, that menu item will be changed to Save a Version.

Lion Versions Save a version Menu

Wednesday, March 02, 2011

Exploring Mac OS X Lion (2): Trackpad Gestures and Mission Control

Looks like Lion depends heavily on trackpad gestures. You can use gestures to scroll view, show Launchpad, switch desktop, switch full-screen applications, show Mission Control. Mission Control could be considered as an enhanced Exposé.

I listed all gestures on Lion.

1. One Finger

Snow leopard: Tap to Click, Dragging, Drag Lock, Secondary Click

Lion: No change

2. Two Fingers

Snow leopard: Scroll, Rotate, Pinch Open & Close, Screen Zoom, Secondary Tap

Lion: little change. In Safari, two fingers swiping left/right means showing the previous/next page. In Snow leopard, you need to use three fingers to swipe.

3. Three Fingers

Snow leopard: Swipe to navigate.

Lion: Mission Control.

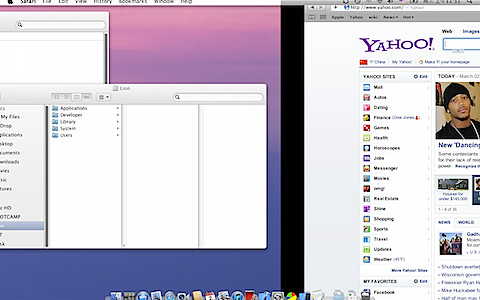
Swipe horizontally to switch desktop, dashboard and the full-screen apps.

3 fingers swipe horizontally in Lion

Exploring Mac OS X Lion (1): Launchpad

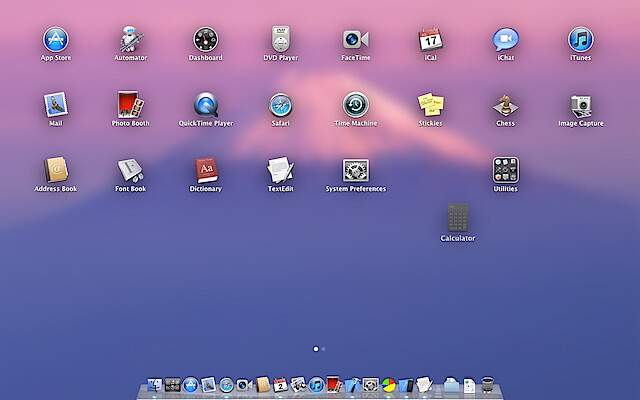
In Mac OS X Lion, there is no icon of "Applications" on the Dock. Launchpad replaced it. Launchpad looks exactly like the springboard on iPad. You can make 4 fingers pinch to activate it. Launchpad supports pages and folders. You can drag an icon to rearrange it and drag it out of current page to create a new page. I tried clicking an icon and holding for a while, but did not see icons shaking.

Drag an icon to rearrange in Launchpad of Mac OS X Lion

However, Launchpad on an external big monitor is not beautiful. The icons are too big. It is not comfortable to see so many big icons on the big monitor.

The users who are using 3-button mouse will have a problem. They cannot switch pages of Launchpad. I think it is a bug.

The dock does not show indicator lights for the running applications by default. You can enable it in System Preferences.

Tuesday, March 01, 2011

Steps to install Mac OS X Lion on external hard drive

Apple just released Mac OS X 10.7 Lion developer preview. There are some new features inspired by iPad. The Launchpad looks like iOS springboard. The apps can run in the full-screen mode. You macbook with Lion will look like an iPad.

However, many people including me only have one machine with Snow Leopard installed. We don't want our valuable data destroyed by the beta OS. It is not safe to upgrade the existing OS to Lion in the existing partition. Can we just install Mac OS X Lion on the external hard drive? Yes!

Steps to install Mac OS X Lion on external hard drive:

1. Plug in your external hard drive to your Mac.

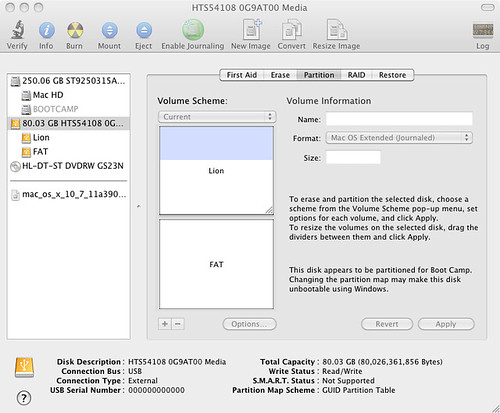
2. Open Utility->Disk Utility. You should see your external hard drive in the left view.

3. Choose your external hard drive (not the partitions) in the left view.

4. Choose Partition in the right view and create an GUID partition with Mac OS Extended (Journaled) format.

If your partitions were created in Windows, they are not GUID partitions. You have to delete all of them and create partitions with Mac OS Extended (Journaled) format. Don't forget to click Options button and choose GUID Partition Table! Otherwise, when you install Lion on this partition, you will receive an error message: this partition is not GUID partition.

GUIDPartition

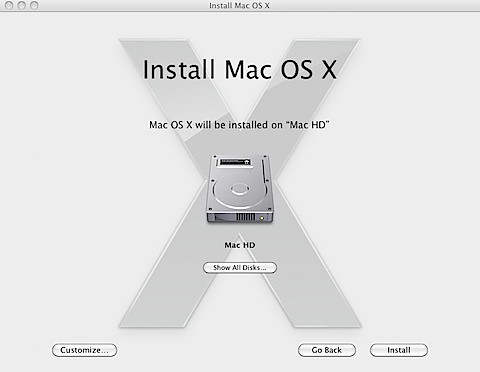
5. After you have created legal partitions, you can start installing Lion. Just in your snow leopard, double click mac os x lion 10.7 .dmg, In the pop-up window, double click "Install Mac OS X", and then click "Continue". Accept the agreement. You will see this window.


Install Mac OS X Lion

6. Click "Show All Disks..." and choose your external hard drive.

7. Follow the instructions on the screen to complete the installation. You will get Lion installed on your external hard drive. If you want to reboot to the snow leopard, just press Option key on the machine startup.

If you installed Lion on another partition and saved a file on snow leopard partition with AutoSave enabled, you may have error on Time Machine in snow leopard. Refer to this post.